Showing posts with label codes. Show all posts

Wednesday, March 7, 2018

Porches for the House on the Lake

The work at the family house on the lake is continuing with the framing inspection complete and now roofing and siding being applied and porch floors and roofs built.

Framed New Screened Porch
This house is all about the continuity of the family that has owned it and used it - first as a full time residence of grandparents starting in the 1920s - and now as a seasonal gathering place for extended families of multiple generations from throughout the country. Some aspects of the home that exist and have existed for as long as many can remember were not negotiable to change in the redesign. One of those elements is the green metal roof- which isn't that old, but lends real character to the home. Another is the white cedar siding which is very traditional and likely original to when it was first built before this family even owned it.

The other thing this house is about is gathering and enjoying the lake. This fact makes the back screened porch the most important "room" in the place. As the largest space, it is one of the few that can accommodate a large group- be it baby shower or marriage celebration or weekend reunion. It is literally the best place (other than sitting on the dock?) on the property to view the lake.

I changed the dimensions and orientation of the former screened porch, as well as how it connects to the house. I made it much deeper- before it was under a long continuation of the main roof and was limited to 9'-10" -way too narrow for comfortable outdoor furniture. I also increased the width by 2' and rotated the roof and removed any flat ceiling so the space is vaulted up to 12' tall at the center roof beam.
Framing of the New Screened Porch

Structural Ridge Beam allows for soaring high space
In addition, since I was giving the space it's own lake-facing-gable roof, not sharing the main roof, I could slide the whole space over a bit. This movement accomplished two things: One, even with the new porch 15' deep instead of 10', I could show the Town's Zoning Board that we hardly were building any closer to the edge of the water. This was important as the existing structure was already encroaching on the allowable 75' setback from the rear/lake. The other important gain of sliding the porch toward the east was that I could connect the kitchen to the screened porch. The old plan lacked this connection, so this will be a great change.

The home has a traditional street-side wrap-around front porch which remains and now ties into the new first floor bedroom with a glass door.

Door to Front Wrap-Around Porch from New Bedroom Addition
Wrap-Around Porch ties into new first floor bedroom addition
Lastly, there is a new small side porch that provides a way to get to the yard from the screened porch and from the yard into the kitchen/back of the house. When a porch is higher than 30" above the grade, the code requires a guard rail for safety. Since we don't want to obscure the lake view with a bunch of solid wood posts, I specified a cable railing system that becomes almost invisible and lends a sleek, nautical element on the mostly traditional exterior.

Side Porch connects house to yard and screened porch
Cable railing system
In addition to the functionality of these porches (outdoor rooms!) the site slopes down toward the lake, leaving lots of storage space under the almost 400SF screened porch. Some of this area will be tall and some low to store boats and other gear. The perimeter will have a traditional lattice treatment and a custom hinged door to easily access and keep hidden that storage space.

Lattice Detail (from another project)

Thursday, October 26, 2017

New Project: Family House on the Lake

Here is a new project to follow on the blog! This is an old family homestead; it's been in the same family since 1923! My clients are three siblings who own the home currently, but they've included their extended multi-generational family in the decision-making process. Despite living out of the area, most still come back to their ancestral family home on the lake at least once a year to relax, sail, paddle, swim, cook-out, and enjoy visiting with family and show their kids where great-grandma and great-grandpa used to live.


The history is charming. My clients remember going to the home in their youth, when their grandparents lived there full-time without indoor plumbing or any insulation and only a wood stove for heat. ("hardy folk" says Jim of his grandparents - I'll say!) Now Jim (the toddler in the photo above) and his sisters enjoy using the home for long weekends, summer vacations, and family reunions and celebrations with their spouses, grown children, and grandchildren.

Before- Street Side

Existing Kitchen 

Before- Lake Side
The building and site are also charming, with porches to relax on, open rafters above a tidy kitchen, and towel hooks for hanging your suit after a swim in the lake- but the structure is at the point it could certainly use some updating and repairs/maintenance. So - here we go: The Family House on the Lake...


The site is small, just over half an acre, and the lake closer to the building and the septic system than is allowed by current regulations. Parking area is minimal, and with so many family members arriving from various places, there can be a lot of cars. The porches are in disrepair and the sleeping spaces lack privacy. The rooms are small, making the yard the only place all of the assembled family can meet.

To solve some of these issues this is what the new design proposes:

  • Tear down detached garage, which is in a state of disrepair, to allow for more parking area and new (further from the lake) traffic-bearing septic system
  • Replace the dilapidated, narrow screened porch with a larger one focused on the lake view and connected to the kitchen and a back deck
  • Raise the roof so the second floor sleeping spaces have more space and can have windows facing the lake to let in cooling breezes at night
  • Add a private first floor bedroom
  • Renovate the single large bathroom into and bathroom and a powder room to better accommodate large groups.
  • Upgrade the electrical, add insulation, repair failing plaster walls & ceilings, repair the front porch roof, plus deal with some other deferred maintenance issues and general upgrades like new lighting/appliances and wallpaper/interior paint
Stay tuned for future posts as the construction and demolition get underway this fall!

Friday, May 19, 2017

Blower Door Test at NHND to the Pond


This week the HERS rater conducted the blower door test on the New House Next Door to the Pond. This tests the air-tightness of the building envelope and measures the number of air changes per hour and is now required for all new construction in NYS. The NHND to the Pond scored a respectable 49 HERS Index rating and 1350cfm50 during the test.

Older homes, built before building wraps or board sheathing or wall board or spray foam insulation can be very porous in terms of outside, un-conditioned air getting in and inside conditioned (heated or cooled) air escaping out. You might think of this as a "drafty" or "leaky" building. And that was the "norm" for many years in construction.

Nowadays we try to decrease our usage of energy and minimize our impact on the environment (or minimize our financial costs - different impetus for different folks, for sure...) and the newest IECC (International Energy Conservation Code) has forced all but historic buildings to meet more stringent insulation and air-tightness standards so they will use less energy to be heated and cooled.

I've always designed my projects to be "green" and while I haven't sought certification by LEED (Leadership in Energy & Environmental Design) or Energy Star, I have always detailed my buildings to be as environmentally friendly as construction can be, sometimes teaching the contractor or inspector about construction details I've learned about in building science classes.  Being "green" usually means creating the best "building envelope" (line separating inside from outside) we can to keep the building's energy usage down to a minimum. (Rather than all the myriad of other "green" ideas, like Forest Stewardship Certified lumber, or reusing materials from deconstructed buildings, or considering the embodied energy of materials/products we build with, or specifying low water-usage fixtures or low-wattage lighting/appliances, or thinking about other sustainable materials, like wool or cotton insulation batting, etc.)

CI layer visible just outside of framing

Recently that's included continuous insulation.  And often the use of spray foam insulation at key trick spots, like the rim joist. Slab edge insulation and the best windows you can afford all help, along with a lot of insulation in the roof/attic. Click here to see an older post about insulation: 2014/02/insulation-phase-1

HRV (on the right) takes heat out of the air before expelling it out of building

When you start getting a super tight building envelope, you need to introduce mechanical ventilation to ensure healthy indoor air. It may seem counter-intuitive (why not just let the building breath???) but the science shows that tight buildings with (continuous running, even) mechanical ventilation systems use less energy. Click here to read an older post about Heat Recovery Ventilators (HRVs) http://cwb-architect.blogspot.com/2014/06/air.html

Insulated Cellar Access
Whoops! Not quite finished yet!


During the test and other check-point inspections potential problem areas were discovered and some were remediated.  The cellar door access was basically a hole in the building envelope, so an insulated interior stud wall was constructed for the insulated, weather-striped door to be installed into. Also it was found that the continuous insulation and finish specified under the cantilevered floor areas was never installed. When that is complete, our numbers might be even better!

Here is the bright & colorful HERS Index graphic:


Wednesday, December 21, 2016

Spray Foam and Rigid Insulation

The New House Next Door to the Pond got an insulation and air sealing inspection today. Next up will be a blower door test, to get some hard data on how well it was installed and if there are any holes that need filling prior to finishing the construction. In addition, an infrared camera can capture images showing where there is heat loss- and if we did that today, we would see a big hole around the cellar access door that needs to be addressed. (Other very notorious holes in building envelope are fireplace chimneys and skylights, neither of which were included in this project by design)


Spray foam in cavities, box beam; Rigid XPS at headers

In this super-tight building envelope design, all walls and roof surfaces have continuous rigid foam insulation, and the wood-framed walls and roof also have cavity insulation. The continuous insulation (CI) material is Extruded Polystyrene (XPS) and has an R-value of about 5 per inch. There is R-5 on wood walls, R-10 on basement walls, and R-20 on all roofs. The cavity insulation, for the most part, is open-cell spray foam with an R-value of about 3.6/in and is located between all exterior 2x4 wood walls studs and between 2x roof rafters and wood roof trusses. Closed cell spray foam was used in one location (the main floor box beam) and that has an R-value of about 6.5/in.

Recessed lights placed in soffits, not in building envelope


This design exceeds minimum R-value requirements of the "Prescriptive Path" of the Energy Conservation Construction Code, but air sealing is probably more important than R-value, really, so it's the high-tech barriers with taped seams and that CI that really make this system excel in the most economical way. Without CI, that infrared camera would show heat transfer at each wall stud and roof rafter; this is "thermal bridging"- the wood is a bridge connecting inside and outside. That won't be the case with the 1"-2" of CI on the walls and 4" CI on the roof.

If only cavity insulation is used, there would be thermal bridges/no insulation at each wall stud


I am very pleased about this project and the team that is working to create a house "built as all houses should be built", as the independent energy inspector stated today. (speaking from an Energy Code Compliance standpoint)
Raised-Heel Scissor truss allows for lots of insulation

Wednesday, June 15, 2016

Site Analysis for the New House Next to the Pond

In the first post about the NHND to the Pond, (read it HERE ) I mentioned how an architect-designed house such as this one starts with a site analysis and a program analysis.  Through the analysis of the site I review the legal, natural, man-made, and physical conditions of the specific building site, as well as the climate/solar path/prevailing winds. The "program" is the architect's term for the rooms or spaces needed/wanted (pretty standard in residential architecture) and where they should be placed in relationship to each other on the site.

Proposed Site Plan
First let's talk about legal restraints. These include required zoning regulations such as setbacks from property lines, water, etc. This information can help inform where the building or driveway/curb cut can be placed (without having to get a variance from the town or special permission from the DEC, for example). The zoning regulations will also set limits on the footprint size, maximum lot area to be covered, maximum and minimum building square footage, and maximum height of primary or accessory buildings so that something completely out of character with the neighborhood cannot be constructed without input/review. Some laws can also include "pattern" books or suggested materials or styles- this is mostly found in village centers and historic districts, and not relevant for this project, which is located outside the village boundary on a rural road.

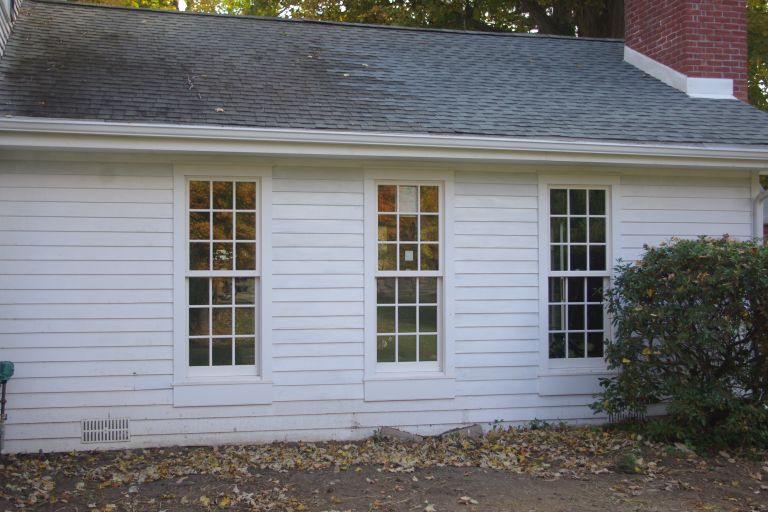
Open Meadow by the Road
The natural features of the site were then examined. This site is large with a stream, pond, wetlands, rock outcroppings, wooded and meadow areas.  There is a lot of grade change and a surveyor was engaged to create a topography map so we could read how water drains off the hillside. This map helps the designers figure out where the rock outcroppings are and where the land/soils might be most suitable for the house, the well, and the septic (SDS) system.


The man-made features on the site include a old farm path leading up the hill, a rudimentary stream crossing (which did not meet current standards and needed to be upgraded), meandering old stone walls at some property lines, and utility poles along the edge of the road. These features are all shown on the survey as well. In a neighborhood or a smaller site, neighboring buildings would be taken into consideration, so the placement of the new building fits in (see NHND post showing a site plan in a village HERE ) but on this site, we have no "context" like that that we need to be sympathetic to.

The physical conditions, like soil type, were looked at by the engineer to determine the design of the SDS system. He also determined the volume of water (design is always for the worst case - the 100 year flood) that will be coming down that hillside so as to design proper drainage for the driveway, and around the structures. This helps set the finish floor elevation and the garage slab elevation so that the building is up enough to be dry, without having its foundation sticking out too much. It also helps us figure out the grading into the garage for a car and setting that so that we don't need an excessive amount of steps between garage and house.
Correctly designed overhangs let in winter sun and block summer sun

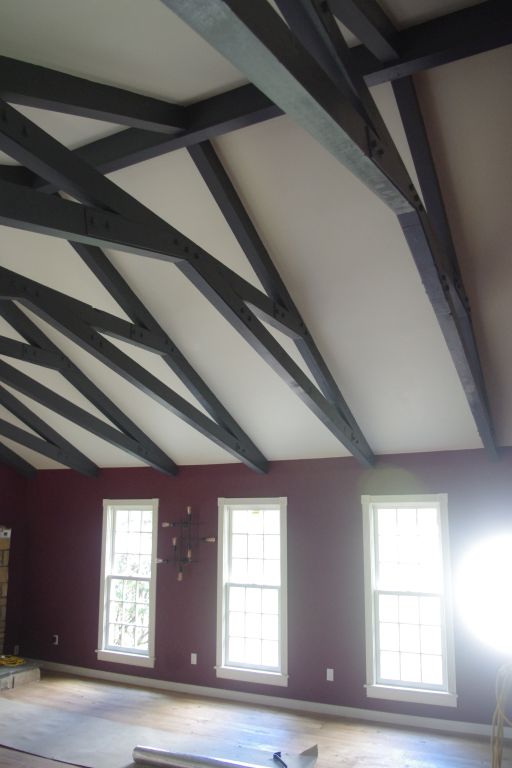
 One of the most important things I look at during the site analysis is the solar orientation. Following the track of the sun across the sky helps layout what rooms might go where and informs the orientation of the long axis of the building. When at all possible, it's best to have the long axis north-south with an eave overhang for shading in summer. Creating a diagram of the height of the sun in winter (when we want to let the sun it the house) and summer (when we want to shade the house from the sun) informs the size of the roof overhangs.

Site Analysis informs design of house
So the site analysis of this pond property showed that what at first glance looked like the best building spot - the level meadow by the road- was not legally allowed, as it was within the DEC wetlands buffer. Therefore, a long driveway would have to be constructed up the hill to a building site in the woods. We elected to have the driveway come from the road at the southern edge of the property, even though this meant crossing the stream, because it meant not crossing through this wetlands buffer, which a driveway from the northern edge would have to do. (the engineer stated that steam crossing would be the easier permit to get). And this way we could re-use the existing farm lane as our driveway, therefore requiring less clearing and re-grading than a new driveway from the north edge of the property.

The SDS system and it's expansion area were placed where the soils could handle the percolation required. The house site was decided to be on a level-ish area not-too-far up the hill in the woods with the house oriented such that it's long axis faces south for ideal solar advantage. A walk-out basement recreation room could be incorporated in the northwest corner where the grade slopes down toward the pond. The garage could be tucked behind on the north, not blocking light or the view of the beautiful house as one approaches. (us architects always want to hide the cars/garage) The south/front of the house can have the porch my clients want while also functioning as the entry, and the west side- near the pond- can be the place for the screened porch. Now we are starting to get into program analysis - and that can be the next post.

Wednesday, October 14, 2015

Raise the Roof


Trusses are great - they enable us to put a roof (or floor) over long spans so we can have large, open rooms, like this family space with a fireplace, TV, and billiards table.

The truss in the existing room, however, was oppressively low. This playroom was placed a couple steps down from the rest of the main floor level of the house, and to walk from the kitchen into the playroom, the bottom chord (horizontal member in b4 pic) actually encroached into the code-required head room. (Code requires 6'-8" vertical space- the height of all standard doors).

In addition to the code violation, it just felt yucky. Here you were, in a large space, with a not-flat high ceiling, but with those thick, dark beams cutting across the space at the top of the wall, you didn't get the benefit of that tall space- you felt squashed from above.
Old Truss Configuration w/ heavy, low bottom chord
Without changing the roof outside or ceiling inside, we modified the truss to raise the interior volume. Don't try this at home! A structural engineer was consulted and angled metal plates with specific bolting patterns were specified to ensure the roof loads were being carried. The low horizontal chord was removed (and some that wood re-used). New angled bottom chords and a high collar tie (the reused timbers) were secured to the existing top chords that follow the ceiling line.

New Truss Configuration
The result is a room that feels much different. We joked it seemed like a pizza parlor before. Now the feel is much more lofty. We also changed the small, high-silled windows to beautiful low-silled 9 over 9 paned windows with a classic molding profile; they let in lots of light and are much more appropriate from the exterior for this historic home. Removing the dark wood wainscot also contributes to this room's transformation. And installation of a new split system for heat and air conditioning means the unsightly baseboard radiator could be removed, allowing for cleaner wall to floor transition.

New windows (same door to kitchen on far left of both pics)

Before- Yucky windows - no light or view!


Take away: space is about more than just space.

New Room - trusses painted


Newly renovated, more classic exterior

Monday, June 16, 2014

Final Electrical

Now that the floors and walls inside the New House Next Door have all been finished, the electrician has been on site installing the final electrical fixtures and outlets. I learned that the sub contractors like electricians and plumbers that come in after the floors are finished work in their stocking feet! The inside needs to be kept clean, so all workers now remove their outside shoes before entering.
 

Inside Garage

Barn Light being installed outside garage

 Because the garage is detached from the house, the electric runs underground to that building, and comes up out of the ground outside the north side door. These wires were pulled through the underground conduit, which was placed and buried last fall, and the garage was fitted with light fixtures and electrical outlets.

Exterior Lights are required by every door

Outside, light fixtures are placed near entrances, and convenience outlets on porches, etc. The cutest idea that was implemented was the "Christmas Light" outlet - placed up high around the front porch roof. :)
Lighting in Bathrooms over mirrow

Shoe-less Electrician installing outlet in kitchen island

Light Fixtures are required over stairs

Floor Outlets can solve furniture placement dilemmas in large rooms
 Inside, special outlets in the floor and kitchen island have been installed, as well as all the light fixtures. The building code is quite specific about light fixture and switching locations - especially at stairs and hallways - so that one can easily get around without having to fumble in the dark. The code is also quite specific about the distance between outlets, so that extension cords don't become a safety hazard. (did you ever live in an old (not updated) place where there is one outlet per room?!)

Lots of folks like to grumble about the building code - or government rules in general - and some even try to "get away with" evading the code- but these rules are there to protect health and human safety and the more I work in this field, the more I try to impress this upon my clients. Of all the sub-contractors on the job site, I think electricians are the ones I've learned from most frequently about some code requirement.


Monday, June 9, 2014

Porch Stairs and Railings

The NHND has a full front porch facing the street and a small back porch that provides access from the backyard and garage area to the house and screened porch. Because of the way the grade slopes down toward the back, the back porch is higher off the ground and requires a 36" high (min) guardrail by code. The front porch is close enough to the ground that a guard rail is not required, however a low rail was decided upon for looks and safety. This lower rail, will look nicer due to it's more reasonable height - codes can make for odd proportions sometimes. (see post on egress window codes)

Back porch stairs
 The rails we designed are traditional and simple 2x2 vertical balusters between a horizontal top and bottom rail. The stairs and posts are a bit more special in the front, and a bit more utilitarian in the back. As is appropriate, the scale for the front entry is more grand than for the rear entry. Regardless of guardrail requirements, each set of steps requires a handrail on at least on side, since they have "two or more" risers.
Front porch stairs

All this code compliant carpentry boils down to one big fact here on site: No more climbing ladders! (and, folks, that means getting closer to time for a tour!)

Wednesday, June 4, 2014

Air

The plumbers have installed the heat recovery ventilator (HRV) and it's associated ductwork. This mechanical air exchange system works together with the exhaust fans (located in each bathroom) to maintain the indoor air quality.

HRV vents out of the attic wall in the back of the house

 Typical residential construction didn't used to have systems like this. It used to be, the building envelope (dividing line between inside, heated space and outside) was leaky enough to provide plenty of fresh air. Todays tighter building envelopes (look at previous posts talking about CI - continuous insulation- for more info) don't allow for a free air exchange (which means we use less fuel to heat and cool our homes- yay!) so we need to provide a mechanical exchange.

This is done quite simply here at the New House Next Door. The two bathroom fans exhaust warm, moist air out. On it's way out, it passes through the HRV, where the heat from that air is removed before the air is expelled to the outdoors. The HRV pulls fresh outside air in, transfers that recovered heat to warm the outside air, and then deposits the fresh air into the house.

The other part of this system that is important to mention is that the attic, where the ductwork and the HRV are located, is conditioned space. Ductwork should always be located within the building envelope for the best efficiency. (see the spray foam insulation applied directly to the underside of the roof sheathing in the picture below)

Ductwork in a conditioned attic - as it should be

Tuesday, May 13, 2014

Stair Railing and Closet Shelving


The stair handrails and closet shelves/clothes rods are installed. The interior trim is all done - including on the oval window, which isn't shown in this photo. The oval trim is made of a flexible synthetic material that will be painted to look like the rest of the wood casings.

Clothes closets have a simple rod with shelf above. Storage closets have shelves. By design, the New House Next Door has a lot of closets- 3 on the first floor, and 4 on the second floor! Two of the most unique closets are the one under the stairs and the one in the painting studio. (the largest second floor room will be used by my MIL as her painting studio, rather than as a master bedroom- view her fantastic work here on Face Book)

The under the stair closet has a sort of magical "The Lion, The Witch & The Wardrobe" quality to me because the coats will be hung across the width of the space, as usual, but one would part those coats and slip behind them to access the shelves against the back wall. I specified double doors for this closet, so that when open they do not block the hallway - a problem in their current house.

The painting studio closet is a wide closet with double doors. Inside will be a counter with a sink, for cleaning brushes, with storage shelves above. The second largest bedroom has a walk-in closet with a pocket door.

The largest storage area, though, is the attic. There is a pull-down stair from the studio ceiling to access the attic. The roof was framed with what is called an "attic truss", which leaves the center, highest space free of diagonal truss chords, so it is usable space. (click to go to wintertime post about roof trusses)

Smallest Bedroom Clothes Closet


Painting Studio Closet- see plumbing for sink poke through wall

Perfect for Hide and Seek - the Closet under the Stair
Attic Pull-Down Stair - before trim