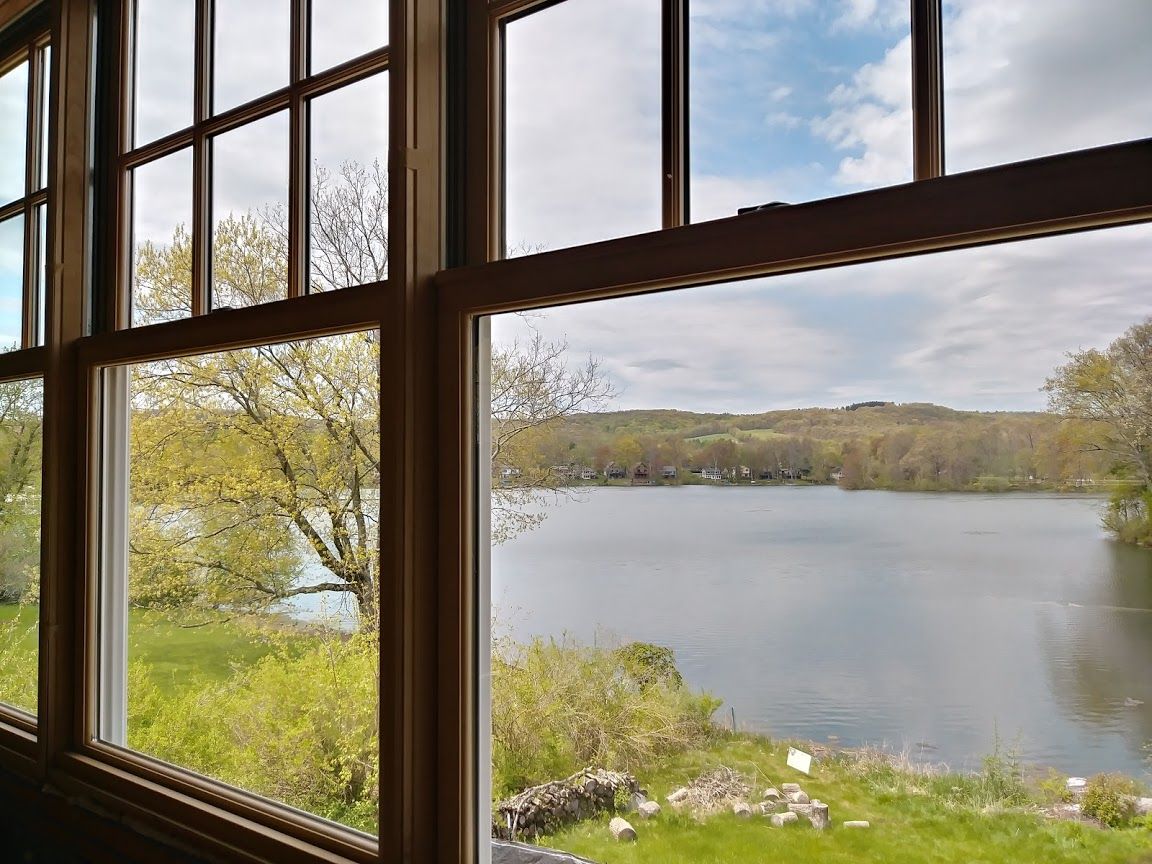
Showing posts with label insulation. Show all posts

Tuesday, September 24, 2019

Energy Conservation Construction Code

Lake Side View
The project I called "The Adirondack Cottage on the Lake" is ready for move in day. I'll include some photos of it here, but what I want to write about is the Energy Code and the Blower Door Test. This house scored a 1.05 ACH (Code requires 3 or less - this was an awesome performance!)

This house was built to the same specifications as all the new construction I've designed for the last 5 or 6 years, even before our current stringent energy code took effect. The energy code is designed by "Climate Zone" and in Dutchess and Columbia County in NYS, we are considered Zone 5. (Ulster County is Zone 6, and requires higher R-values)

Great Room Fireplace

Barn Wood Accent Wall separates Kitchen Area
There are various ways to meet the code, but as long as your building does not have glazing area exceeding 15% of the gross exterior wall area, following the Prescriptive requirements is the easiest way to go and I have come up with a system that works well. It exceeds the code requirements for insulation, receives flying colors on the blower door test, which tests for air infiltration, performs well in regards to vapor transmission, dew point, and moisture, and is relatively fool-proof to construct and inexpensive to build.

Framing and Installing the exterior continuous INSULATED sheathing
I started using continuous wall insulation in addition to the wall stud/cavity insulation so long ago I had to explain it to every builder I worked with. The easiest method is to use an integral structural insulated sheathing, like Zip-R. Click here to see my previous post about CI and Zip-R: cwb-architect.blogspot.com/2013/sheathing-ci

For our climate zone, what works is using 1" of exterior continuous foam insulation over 2x4 studs with Rockwool Batt in the cavities. I've had guys tell me they felt like they were back in the 1970s by using 2x4s instead of 2x6s, for the wall studs, as well as worry that the building will not be "stout" or "strong". Fear not! 2x4s are strong enough to be the framing of our walls. Fun Fact: 2x6s were only used to "fit more insulation" - but what we now know from Building Science teaches us about the value of using a continuous layer of insulation and air-barrier and the major weaknesses- like thermal bridging- of relying on cavity insulation alone. So! What's old is new again, and we frame our walls with 2x4 studs.
Rockwool Cavity Insulation in walls
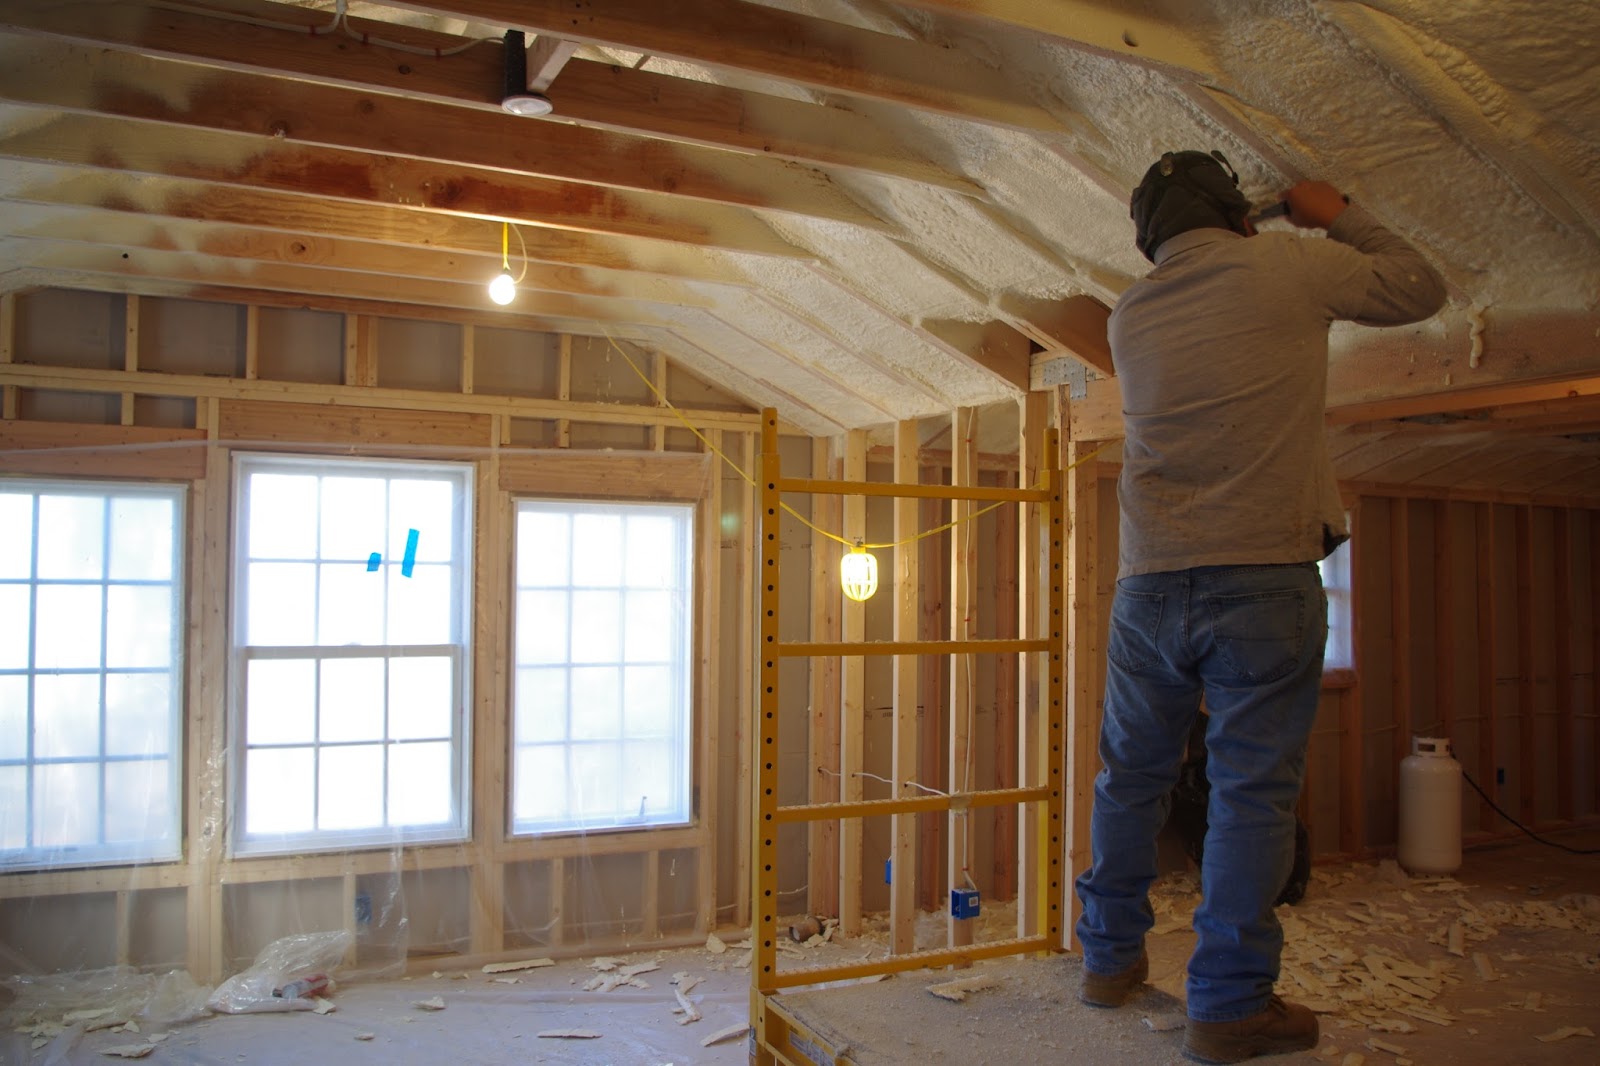
Closed cell spray foam in an energy intensive product, so we use it only where we need it- the rim joists at the floor lines and, if we are conditioning the attic space, directly applied to the underside of the roof deck. This un-vented roof system works especially well for 1 1/2 story type designs, like this house, because the second floor rooms are really in the roof. Conditioning the attic can make sense in other instances too, like if there is mechanical ductwork up there. (Fun Fact: The Energy Code requires all ductwork to be sealed, but only ductwork located in un-conditioned spaces needs to be insulated.)
Foyer Entry- Catwalk Overlook into Great Room
Caulking and low density foam get used liberally at all joints and penetrations, including around all windows. I try to talk client's out of using skylights, as they are a big hole in the roof top insulation. I have detailed crawlspace walls to be insulated in various ways, depending on the site and future use of the space. And if I could, I'd use triple paned windows - but most budgets lead us to good, low E glazed double paned window units.

The mechanical systems REALLY need to be looked at closely to not be over-designed. We are so close to Passive House standard (.6 ACH) and if we can do just a bit more to seal our building envelope to acheive that # at our blower door test, then it's a whole new ball game - using super small and efficient heating/cooling systems for super air-tight spaces!

Spray Foam insulation makes an air-tight and quiet building

Thursday, May 9, 2019

Chapter 4: Adirondack Lake Cottage - Siding, Trim, & Insulation

Beautiful Day at the Adirondack Cottage on the Lake
At the beautiful lake-side property for the "Adirondack Cottage" project, spring has sprung. The lake is no longer frozen, the winter winds have gone away till next year, and the trees have budded out their leaves- including the maple tree we saved with our site planning (see Chapter 1 link below). We protected it's roots from heavy machinery by marking around it off limits to vehicles, and so far so good- it looks healthy!

Sheetrock being delivered in the front door (and leafed out tree in front yard!)
While it may look complex, the roof is a basic gable for the main part of the house, with dormers popping out of the roof (2 front, 1 back) to create space for the second floor bedrooms and windows up high in the entry foyer. The garage has it's own rotated roof, as does the great room bump out with the soaring feature window. The main roof slopes down in front to cover the front porch roof - with a gable detail over the entry- and slopes down over the back master bedroom glass doors, supported by some brackets to add a special detail at the location of the private patio.

Master Bedroom end of the house roof extension over glass door

View from inside the Master Bedroom, which will have it's own private patio
Inside the electricians and plumbers have installed their rough wiring, piping and duct-work and the fixtures and compressors and some cabinetry is on site. The cavities have all been insulated with mineral wool batts in the walls, and closed cell spray foam in the roofs. The attached garage has been thermally isolated and fire separated from the house. In addition to the cavity being insulated, the walls also have taped continuous insulated sheathing to help create a tight envelope that allows very little air infiltration. (We will find out how little on blower door test day!) This continuous insulation is so important when you see places, like near doors as in the photo above, that have multiple wood studs (meaning no cavity for insulation).

Cathedral-like view as one enters the front door

Front Bedroom- looks toward saved tree
In keeping with the traditional "cottage" style, most of the windows used here are traditional double hung style units. We elected for what they call "cottage style" divided lite patterns, which means the top sash only got divided into 6 smaller "lites"- all the better for seeing the view out the clear, bottom sash. Of course there are exceptions: the windows in the front bedroom could not meet the egress requirement as double hung units and so I specified casements there (see it open in the photo above?) with a simulated check rail and divided lite pattern similar to the double hung units used throughout the rest of the house, so they blend in. The windows that create the feature in the high gable wall in the Great Room have no divided lites, so the view is less obscured.

Back Bedroom windows look toward water
Great Room with lots of height and windows accentuating the lake view
Outside the exterior trim and shingle-style siding was being installed. These are some of the important details that lend the home the moniker "Adirondack Cottage". The shingle style siding in a warm green color (Certainteed brand "Spruce" Cedar Shake Style Siding) and helps lend an air of authentic, highly detailed natural cedar shake, while being "maintenance free" vinyl. This "shingle" infills around the windows and doors on most of the exterior walls, abutting the white edge trim. I detailed places with special trim and brackets, to call attention to the architecture at important places like the front porch, roof gables, and glass doors leading toward the lake. Especially note the traditional gable "crows foot" detail. These special touches, along with the one-and-a-half story building massing and the stone base details soon to come were all selected to reinforce the Adirondack feeling the clients wanted.

Glass Doors with Transom window above from Great Room
Pair of Glass Doors from Dining Room to Deck

Siding and Trim and Details, oh my!

Wait until the interior trim work is installed and stained and you see how cozy that makes the inside spaces! Until next time...

To read the previous post on this project click on the links below:

cwb-architect.blogspot.com/chapter3-adirondackcottageonlake
cwb-architect.blogspot.com/chapter2-adirondackcottageonlake
cwb-architect.blogspot.com/chapter1-adirondackcottageonlake

Tuesday, February 20, 2018

Blue House update

First Floor Kitchen space is opened up to Office with beam in ceiling
New Master Bedroom with vaulted ceiling and sunset windows
Work has been progressing at the Blue House next to the School. The windows were installed, as well as rough electrical and plumbing. Then insulation was placed in the cavities of roofs and walls. (Remember all walls also have continuous insulation integral with the sheathing, which is great for better air sealing and reducing thermal bridges.) Exterior trim was installed around windows. Interior sheet rocking of walls and ceilings happened. With that surface applied, one can really see what the rooms will feel like! Next is shingle siding, flooring, painting, finish electric/plumbing, and interior cabinetry! (and the new screened porch those french doors will lead to!)

Back elevation
Site of the future second floor laundry and Master Batrh


Sheet rock on wall in Dressing Room / Walk in Closet/ Master Bathroom

Kitchen! Ready for cabinetry and flooring

Sunny Master Bedroom


Friday, May 19, 2017

Blower Door Test at NHND to the Pond


This week the HERS rater conducted the blower door test on the New House Next Door to the Pond. This tests the air-tightness of the building envelope and measures the number of air changes per hour and is now required for all new construction in NYS. The NHND to the Pond scored a respectable 49 HERS Index rating and 1350cfm50 during the test.

Older homes, built before building wraps or board sheathing or wall board or spray foam insulation can be very porous in terms of outside, un-conditioned air getting in and inside conditioned (heated or cooled) air escaping out. You might think of this as a "drafty" or "leaky" building. And that was the "norm" for many years in construction.

Nowadays we try to decrease our usage of energy and minimize our impact on the environment (or minimize our financial costs - different impetus for different folks, for sure...) and the newest IECC (International Energy Conservation Code) has forced all but historic buildings to meet more stringent insulation and air-tightness standards so they will use less energy to be heated and cooled.

I've always designed my projects to be "green" and while I haven't sought certification by LEED (Leadership in Energy & Environmental Design) or Energy Star, I have always detailed my buildings to be as environmentally friendly as construction can be, sometimes teaching the contractor or inspector about construction details I've learned about in building science classes.  Being "green" usually means creating the best "building envelope" (line separating inside from outside) we can to keep the building's energy usage down to a minimum. (Rather than all the myriad of other "green" ideas, like Forest Stewardship Certified lumber, or reusing materials from deconstructed buildings, or considering the embodied energy of materials/products we build with, or specifying low water-usage fixtures or low-wattage lighting/appliances, or thinking about other sustainable materials, like wool or cotton insulation batting, etc.)

CI layer visible just outside of framing

Recently that's included continuous insulation.  And often the use of spray foam insulation at key trick spots, like the rim joist. Slab edge insulation and the best windows you can afford all help, along with a lot of insulation in the roof/attic. Click here to see an older post about insulation: 2014/02/insulation-phase-1

HRV (on the right) takes heat out of the air before expelling it out of building

When you start getting a super tight building envelope, you need to introduce mechanical ventilation to ensure healthy indoor air. It may seem counter-intuitive (why not just let the building breath???) but the science shows that tight buildings with (continuous running, even) mechanical ventilation systems use less energy. Click here to read an older post about Heat Recovery Ventilators (HRVs) http://cwb-architect.blogspot.com/2014/06/air.html

Insulated Cellar Access
Whoops! Not quite finished yet!


During the test and other check-point inspections potential problem areas were discovered and some were remediated.  The cellar door access was basically a hole in the building envelope, so an insulated interior stud wall was constructed for the insulated, weather-striped door to be installed into. Also it was found that the continuous insulation and finish specified under the cantilevered floor areas was never installed. When that is complete, our numbers might be even better!

Here is the bright & colorful HERS Index graphic:


Wednesday, December 21, 2016

Spray Foam and Rigid Insulation

The New House Next Door to the Pond got an insulation and air sealing inspection today. Next up will be a blower door test, to get some hard data on how well it was installed and if there are any holes that need filling prior to finishing the construction. In addition, an infrared camera can capture images showing where there is heat loss- and if we did that today, we would see a big hole around the cellar access door that needs to be addressed. (Other very notorious holes in building envelope are fireplace chimneys and skylights, neither of which were included in this project by design)


Spray foam in cavities, box beam; Rigid XPS at headers

In this super-tight building envelope design, all walls and roof surfaces have continuous rigid foam insulation, and the wood-framed walls and roof also have cavity insulation. The continuous insulation (CI) material is Extruded Polystyrene (XPS) and has an R-value of about 5 per inch. There is R-5 on wood walls, R-10 on basement walls, and R-20 on all roofs. The cavity insulation, for the most part, is open-cell spray foam with an R-value of about 3.6/in and is located between all exterior 2x4 wood walls studs and between 2x roof rafters and wood roof trusses. Closed cell spray foam was used in one location (the main floor box beam) and that has an R-value of about 6.5/in.

Recessed lights placed in soffits, not in building envelope


This design exceeds minimum R-value requirements of the "Prescriptive Path" of the Energy Conservation Construction Code, but air sealing is probably more important than R-value, really, so it's the high-tech barriers with taped seams and that CI that really make this system excel in the most economical way. Without CI, that infrared camera would show heat transfer at each wall stud and roof rafter; this is "thermal bridging"- the wood is a bridge connecting inside and outside. That won't be the case with the 1"-2" of CI on the walls and 4" CI on the roof.

If only cavity insulation is used, there would be thermal bridges/no insulation at each wall stud


I am very pleased about this project and the team that is working to create a house "built as all houses should be built", as the independent energy inspector stated today. (speaking from an Energy Code Compliance standpoint)
Raised-Heel Scissor truss allows for lots of insulation

Thursday, August 18, 2016

NHND to the Pond Framing Update

Front of the House - Screen Porch on left/west, Gable Roof for Front Porch 
Lots has been happening at the New House Next Door to the Pond. The foundation for the garage is poured. The garage walls and roofs are framed. Forms are in place for pouring a large retaining wall. The front porch roof rafters and screen/sun porch roof rafters are in place. Some of the wall sheathing (which is insulated sheathing, offering continuous insulation - see former post HERE to read about CI) is being installed, as well as the roof sheathing to help keep it dry inside through all these summer thundershowers. (wall sheathing is green, roof sheathing is red) These solid surfaces help you see the shapes of the building more clearly in the photos while also starting to show the dormer design, window seat bump-outs in eating area and master bedroom, and window placement and size. You can see/feel how the light and views will be connected between inside and out as well as some of the intricacies of the massing. (exciting stuff!)


Back of the House - Dormer pops up in roof for stairway

Bump-out Window Seat in Master Bedroom Wing- Long Southern Dormer for Second Floor Bedrooms
Garage Wall poured and interior tamped down and ready for slab pour

Garage Walls & Roof Framed

Screen/Sun Porch- Looking toward Pond and Sunset Views

Stair Landing Window Frames Wooded View


Friday, July 29, 2016

Framing at the New House Next to the Pond

Here is an update on The New House Next to the Pond.

The last post (click HERE to read) showed the site work and the footings - photos of dirt and concrete without too much to help you envision the beautiful house that will be there... But now we have insulated foundation walls and the first floor system and first floor walls framed.
View from Southwest / Driveway approach
In the photo above you can see the walk-out basement room on the left that looks toward the pond. Dirt and a retaining wall will bring the grade higher than it looks now, so that the front porch will only be 3 steps up. You can see the cardboard sonotubes sticking up at the front/south and on the west. These will be filled with concrete to provide a footing for the front porch and screen/sun porch roofs.
On the right side you can see the cantilever bump-out that is part of the eating area, and then the master bedroom wing in the background. In general, you can start to see where windows or doors will be located.

Peeking into the basement through the walk-out door
 Some plumbing has been roughed in under the basement slab so that a future bathroom can be built on the lowest level. (white pipes sticking up on the right). The opening in the floor shows where the stair will connecting the levels.

North Side Elevation
 This is the back of the house. On the left is the master bedroom wing, which also is where the garage will connect into the mud room. On the right is the high spaces for the office and living room with the stair in between.

South Elevation (front)
Footing forms await concrete delivery for garage
The 24' x 36' garage is tucked behind the house. They will start building that next and then build a connection between the roofs for a dry walk from house to car.

Coming up: Second Floor framing and Roof!

Wednesday, April 27, 2016

NHND in the Mountains update

Front now has it's two porches, exterior trim and casing is beginning to be installed

I went to the Catskills to check on the progress of the New House Next Door to the Mountains that is currently under construction and here is an update. (There are previous blog posts on this project that you can look at, too)

View from front porch/ front door looking south
The exterior isn't much changed since winter, but inside all rough HVAC, plumbing and electrical work is complete and spray foam insulation has been installed. Next step will be installing the wall board. Here are some photos. You can really appreciate the spectacular mountain vista from the front windows, which you could not in the previously posted over-cast winter photos.

View looking out South Windows in sitting area off Kitchen
 With the walls appearing to have more of a solid surface because of the trimmed spray-foam cavity insulation, you can see the shape of the interesting interior spaces created by the dormers, knee walls, and angled roof lines. You can also see the number of windows and the light and views they let inside.

Vaulted ceiling in Nantucket Dormer

My favorite space is the fun, open loft space over the living room and at the top of the stairs. With its wide, high, full-of-windows Nantucket dormer, it feels really unique and I like the way it allows the upstairs and downstairs rooms to connect with only a guard rail as separation. That seems to create a family connected-ness that I think makes sense for a house designed for extended family weekend gatherings.


Vaulted Ceiling in Nantucket Dormer- Partial view
Loft that Overlooks Double-Height Living Room (no guard rail yet- Akk!)
 
Second Floor Bedroom w/ Angled Ceilings and Dormers
 
Standing in Living Room looking toward front (south) showing loft above