Tuesday, December 24, 2019

Making things Merry and Bright!

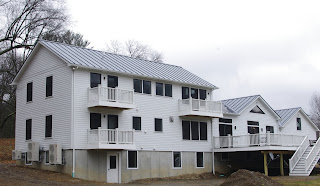
Back Elevation with added windows and glass door
Back Elev - BEFORE

This project is located in a historic village and didn't need to gain any square footage, but needed some big changes to update the kitchen and bath and make the whole house work better. A single floor addition had been added off the back of the two story traditional structure, but the rooms were narrow and had no windows to the back yard. They felt cramped and dark and the kitchen, while it had nice appliances and cute cabinets, was very separate from the main living spaces and accessed by a small passage. And the only bathroom was on the first floor - a flight of stairs down from the bedrooms on the second floor.

We changed all that by removing the wall between the two narrow back rooms, adding a beam, raising the ceiling height, and adding double windows with transoms above and a sliding glass door on that previously blank back wall. This new expansive room now has windows on three sides and offers a ton of space for lots of kitchen cabinetry, counter tops, and storage, as well as a pantry, seating area, and peninsula. It's a bright and airy eat-in kitchen and is more open to the rest of the first floor now, because we widened the trimmed opening to the dining room.


Inside the new bright, tall kitchen space. Double window will be over kitchen sink
Wider Trimmed Opening connects to Dining Room. New efficient heat and A/C mini split on wall
The first floor bathroom was gutted and is transformed into a Den-type room to house the TV like the narrow back room used to, and the small hallway and former laundry closet has been transformed into a first floor powder room. The main bath and laundry move upstairs into an unused bedroom. It will be lovely and traditional-feeling with wainscoting, wood flooring, and a window seat, but also modern and clean with all new fixtures, lighting,  tile, and a heated towel rack.

When working in an older home, I often have the contractor match or reuse the historic interior trim. By using wainscot, traditional lighting and door hardware, and window and door casings with top blocks and bottom plinths, the new rooms don't feel out of place next to the original early 1900s rooms. But the new rooms are decidedly updated with lots of glass for letting in sunshine and views to the private back yard, a more open flow and feeling, high efficiency mechanicals, and custom tiled back-splash and tub surround. (pics next time!)

Former Narrow Den Room
Former Narrow Kitchen
When it's all done in January I'll post final pictures of this merry and bright redo!

Tuesday, September 24, 2019

Energy Conservation Construction Code

Lake Side View
The project I called "The Adirondack Cottage on the Lake" is ready for move in day. I'll include some photos of it here, but what I want to write about is the Energy Code and the Blower Door Test. This house scored a 1.05 ACH (Code requires 3 or less - this was an awesome performance!)

This house was built to the same specifications as all the new construction I've designed for the last 5 or 6 years, even before our current stringent energy code took effect. The energy code is designed by "Climate Zone" and in Dutchess and Columbia County in NYS, we are considered Zone 5. (Ulster County is Zone 6, and requires higher R-values)

Great Room Fireplace

Barn Wood Accent Wall separates Kitchen Area
There are various ways to meet the code, but as long as your building does not have glazing area exceeding 15% of the gross exterior wall area, following the Prescriptive requirements is the easiest way to go and I have come up with a system that works well. It exceeds the code requirements for insulation, receives flying colors on the blower door test, which tests for air infiltration, performs well in regards to vapor transmission, dew point, and moisture, and is relatively fool-proof to construct and inexpensive to build.

Framing and Installing the exterior continuous INSULATED sheathing
I started using continuous wall insulation in addition to the wall stud/cavity insulation so long ago I had to explain it to every builder I worked with. The easiest method is to use an integral structural insulated sheathing, like Zip-R. Click here to see my previous post about CI and Zip-R: cwb-architect.blogspot.com/2013/sheathing-ci

For our climate zone, what works is using 1" of exterior continuous foam insulation over 2x4 studs with Rockwool Batt in the cavities. I've had guys tell me they felt like they were back in the 1970s by using 2x4s instead of 2x6s, for the wall studs, as well as worry that the building will not be "stout" or "strong". Fear not! 2x4s are strong enough to be the framing of our walls. Fun Fact: 2x6s were only used to "fit more insulation" - but what we now know from Building Science teaches us about the value of using a continuous layer of insulation and air-barrier and the major weaknesses- like thermal bridging- of relying on cavity insulation alone. So! What's old is new again, and we frame our walls with 2x4 studs.
Rockwool Cavity Insulation in walls
Closed cell spray foam in an energy intensive product, so we use it only where we need it- the rim joists at the floor lines and, if we are conditioning the attic space, directly applied to the underside of the roof deck. This un-vented roof system works especially well for 1 1/2 story type designs, like this house, because the second floor rooms are really in the roof. Conditioning the attic can make sense in other instances too, like if there is mechanical ductwork up there. (Fun Fact: The Energy Code requires all ductwork to be sealed, but only ductwork located in un-conditioned spaces needs to be insulated.)
Foyer Entry- Catwalk Overlook into Great Room
Caulking and low density foam get used liberally at all joints and penetrations, including around all windows. I try to talk client's out of using skylights, as they are a big hole in the roof top insulation. I have detailed crawlspace walls to be insulated in various ways, depending on the site and future use of the space. And if I could, I'd use triple paned windows - but most budgets lead us to good, low E glazed double paned window units.

The mechanical systems REALLY need to be looked at closely to not be over-designed. We are so close to Passive House standard (.6 ACH) and if we can do just a bit more to seal our building envelope to acheive that # at our blower door test, then it's a whole new ball game - using super small and efficient heating/cooling systems for super air-tight spaces!

Spray Foam insulation makes an air-tight and quiet building

Monday, June 24, 2019

New House Next to the Mountains - Final Photos

West Elevation View
The New House Next to the Mountains is located on a rural site with a spectacular view of the Catskill Mountains. This is an efficient new building, but was designed to look a bit like an historic farmhouse that had been across the street and in the family for generations. This house was constructed a few years ago, but I got out there today to take some final photographs. You can read some other posts on this project by clicking on these links:
cwb-architect.blogspot.com/2016//framing-another-new-house-next-door
cwb-architect.blogspot.com/2016//nhnd-in-mountains-update
cwb-architect.blogspot.com/2016/nhnd-to-mountains-interior-finishes

Front View of New House Next to the Mountains
Entry Side View of NHN2theMtns

BEFORE-Family Homestead that couldn't be renovated was demolished
 When the clients first hired me, the intention was to renovate the family homestead, but exploration of the neglected structure showed that it would be too costly, so that building was demolished. It was decided to build at a more advantageous spot on the site, but recall much of the former home's layout- with a lot of modern updates and efficiencies. See this link about the former house: (photo above)
cwb-architect.blogspot.com/2015/when-is-building-too-far-gone-to-renovate

Open Loft Space at the top of the stairs overlooks Living Room

Loft View -Nantucket Dormer
Living Room with custom wood whole-wall entertainment center

The many roof lines and porches and dormers create the idea of it being added to over time and create cozy nooks for desks and beds upstairs. The new location meant we could face the house toward the south and have lots of windows toward the sun and view. While the exterior is clean-line traditional with it's white clapboard siding and pitched gable roofs, the interior is very open and airy and feels decidedly updated and modern, even though we used some classic moulding profiles. I used a "Nantucket" dormer along the front to create more space for a larger second floor and a playful open space that looks down into the living room.

Living Room Fireplace

Vanity Cabinet
Elements from the demolished building were saved, like the heavy hand hand-hewn beams. This wood was reused creatively by the cabinet maker to create a unique kitchen island, master bath vanity, and living room entertainment center. Stones were gathered from the site to use around the wood burning fireplace.

Farmhouse Kitchen with so many windows
Dining Room View toward Kitchen
The kitchen exudes farmhouse charm with it's cheerful green painted wood cabinets, glass door fronts, bin pull style hardware, and open shelving either side of the farmhouse sink. Windows abound to and fill the spaces with natural light, bringing the outdoors in. The house was built to act as a weekend home during skiing and hunting seasons, to replace the family home that generations of the family had visited across the dirt road. But now that the owners have retired to live here full time, and they enjoy the feeling that this new clean house is reminiscent of other house, but with fresh air/light/life breathed into it.

Living Room with transom windows toward the back
Foyer- View toward Front Door & Living Room

Homeowners enjoying the view

Thursday, May 9, 2019

Chapter 4: Adirondack Lake Cottage - Siding, Trim, & Insulation

Beautiful Day at the Adirondack Cottage on the Lake
At the beautiful lake-side property for the "Adirondack Cottage" project, spring has sprung. The lake is no longer frozen, the winter winds have gone away till next year, and the trees have budded out their leaves- including the maple tree we saved with our site planning (see Chapter 1 link below). We protected it's roots from heavy machinery by marking around it off limits to vehicles, and so far so good- it looks healthy!

Sheetrock being delivered in the front door (and leafed out tree in front yard!)
While it may look complex, the roof is a basic gable for the main part of the house, with dormers popping out of the roof (2 front, 1 back) to create space for the second floor bedrooms and windows up high in the entry foyer. The garage has it's own rotated roof, as does the great room bump out with the soaring feature window. The main roof slopes down in front to cover the front porch roof - with a gable detail over the entry- and slopes down over the back master bedroom glass doors, supported by some brackets to add a special detail at the location of the private patio.

Master Bedroom end of the house roof extension over glass door

View from inside the Master Bedroom, which will have it's own private patio
Inside the electricians and plumbers have installed their rough wiring, piping and duct-work and the fixtures and compressors and some cabinetry is on site. The cavities have all been insulated with mineral wool batts in the walls, and closed cell spray foam in the roofs. The attached garage has been thermally isolated and fire separated from the house. In addition to the cavity being insulated, the walls also have taped continuous insulated sheathing to help create a tight envelope that allows very little air infiltration. (We will find out how little on blower door test day!) This continuous insulation is so important when you see places, like near doors as in the photo above, that have multiple wood studs (meaning no cavity for insulation).

Cathedral-like view as one enters the front door

Front Bedroom- looks toward saved tree
In keeping with the traditional "cottage" style, most of the windows used here are traditional double hung style units. We elected for what they call "cottage style" divided lite patterns, which means the top sash only got divided into 6 smaller "lites"- all the better for seeing the view out the clear, bottom sash. Of course there are exceptions: the windows in the front bedroom could not meet the egress requirement as double hung units and so I specified casements there (see it open in the photo above?) with a simulated check rail and divided lite pattern similar to the double hung units used throughout the rest of the house, so they blend in. The windows that create the feature in the high gable wall in the Great Room have no divided lites, so the view is less obscured.

Back Bedroom windows look toward water
Great Room with lots of height and windows accentuating the lake view
Outside the exterior trim and shingle-style siding was being installed. These are some of the important details that lend the home the moniker "Adirondack Cottage". The shingle style siding in a warm green color (Certainteed brand "Spruce" Cedar Shake Style Siding) and helps lend an air of authentic, highly detailed natural cedar shake, while being "maintenance free" vinyl. This "shingle" infills around the windows and doors on most of the exterior walls, abutting the white edge trim. I detailed places with special trim and brackets, to call attention to the architecture at important places like the front porch, roof gables, and glass doors leading toward the lake. Especially note the traditional gable "crows foot" detail. These special touches, along with the one-and-a-half story building massing and the stone base details soon to come were all selected to reinforce the Adirondack feeling the clients wanted.

Glass Doors with Transom window above from Great Room
Pair of Glass Doors from Dining Room to Deck

Siding and Trim and Details, oh my!

Wait until the interior trim work is installed and stained and you see how cozy that makes the inside spaces! Until next time...

To read the previous post on this project click on the links below:

cwb-architect.blogspot.com/chapter3-adirondackcottageonlake
cwb-architect.blogspot.com/chapter2-adirondackcottageonlake
cwb-architect.blogspot.com/chapter1-adirondackcottageonlake

Wednesday, April 24, 2019

Final Photos of Modern Farmhouse After a Fire

New Front of House

Front- BEFORE
Back- BEFORE
Move in day has come to the family whose house burned down! It's been rebuilt in a new bigger, better way with modern air sealing and HVAC systems, upscale finishes, and reorganized spaces with a focus on open rooms that connect to the outdoors, while also offering private spaces to each resident of the extended family living here. This 'Modern Farmhouse' used to be a Cape Cod style home with a cramped kitchen, awkward dated sunken family room, and small dark bedrooms, without much connection to the beautiful mountain views and sunlight available on the site.
New Back of House
When the home burnt, the foundation was the only piece we could re-use and the grading around the house- with it's back basement walk-out door- remained as is for our new design. Staying atop that footprint (while adding a mud room and garage to the side of it) set the design constraints, but when thinking about rebuilding, we made bold changes to the building massing, roof shape, floor plan, windows, and feel/style of the home to better fit the dynamic family who lives there. We omitted the back sun room and wrap around porch, increased the size of the back deck, and added a traditional front porch entry.

Living Room - Wet Bar near Glass Doors to Deck
Living Room - toward front and Foyer, Hall to Bedrooms
The new home is light-filled and spacious with a chef's kitchen connected through a brick archway to a great room with a fireplace, wet bar, and enormous deck. All those windows and glass doors made the interior so bright and open that the old "sun porch" room you see in the "BEFORE" photo didn't need to be recreated in our new design. All the public spaces have glazing toward the south/back/mountain view and the deck. The new bedrooms have full-height or vaulted ceilings with glass doors to individual balconies and their own custom bathrooms. The building envelope is super tight and well insulated and the new HVAC system is super high efficiency. The materials are classy inside and out - and the site work, when complete, will boast a circular drop-off driveway at the front porch and two-story foyer front entry, and a patio with a hot tub off the back. (The spa tub was existing, and remained untouched by the fire and the water damage after the fire.)

Kitchen - toward front

Kitchen - toward Dining/Back & connection to Deck and Living Room

Mud Room - Cubbies by Garage Entry
Dutch Door from Kitchen to Mud Room
and a Pet Door too


Walk-in Pantry in Kitchen


Darker colors used in Upstairs Study
Laundry Room
Interesting and unique custom details abound here to make you smile. We have built-in cushioned benches in the eating nook and the mud room entry. We have cubicles for organizing in the mudroom, dressing room, and pantry. There is ship lap wainscoting in the bathroom and the mud room and custom live-edge wood used as a sink base and as the fireplace mantel shelf. Barn wood creates a cozy plank ceiling in the master bedroom. Fun flooring appears in the Dressing Room and the Laundry Room. And high transom windows let in lots of light. The tile floors have warming mats to prevent cold feet, and while most of the interior door and window trim is painted white, the Study received a stained wood finish instead. Some of the smaller, private rooms have special wall colors, but the main public spaces remain neutral with their wall color. The interior doors and door/window trim is modeled after a traditional Craftsman design and has oil rubbed bronze hardware. While each room has its own unique features, theseconsistent details like doors, trim, and wood flooring bring continuity to the house as a whole.

Two Story Foyer Entry

Custom Hall Bathroom


Restaurant-style Dramatic Powder Room
Happy Dressing Room

Shoe Cubbies in Dressing Room

Master Bedroom w/ Barn Wood on Vaulted Ceiling & Lots of Light


Pet Doors allow the cat to leave the bedroom
This project was a joy to work on. I am often helping people improve their housing by making it work better for them and be more beautiful and efficient, but in this case, it was more than that. These client's took lemons and made lemonade, to use an inadequate phrase for the circumstances. The house they had moved into only months before was gone, along with all their belongings, and they always had smiles when I met with them. They  deliberately choose awesome interior finishes everywhere- from the lighting, to the fireplace design, to the plumbing fixtures and tile, to the kitchen appliances. They had a great contractor who could implement the ideas shown from a photo. And now they have a house that is truly personal to them and they are so happy to be living in it together.

Click here to read the previous posts about this project:

http://cwb-architect.blogspot.com/2018/12/modern-farmhouse-after-fire-finishes.html

https://cwb-architect.blogspot.com/2018/10/modern-farmhouse-mechanicals-roofing.html

https://cwb-architect.blogspot.com/2018/08/new-house-after-fire-framing.html

https://cwb-architect.blogspot.com/2018/07/rebuilding-modern-farmhouse-after-fire.html